Setting Up Email Accounts on Different Mail Clients
NOTE: The following information is primarily for clients of NetService Web Design and NetService Hosting.
To establish a connection between your mail client and the server, you will need the following information: –
- E-mail account: my_email@my-domain.com
- POP3 (incoming mail server): mail.netservicehosting.com, port 995
- IMAP (incoming mail server): mail.netservicehosting.com, port 993
- SMTP (outgoing mail server): mail.netservicehosting.com, port 465
Please note that our outgoing mail server requires authentication so you will have to enable this option, which can be different depending on the mail program you are using.
Here is how to enable the authentication for commonly used mail clients: –
- Outlook: check the box “My server requires authentication”
- Eudora: check the box “Authentication allowed”
- Thunderbird: enable the option “Use name and password”
- Mail for Mac OS X: check the box “Use authentication when sending mail”, and set authentication to “MD5 Challenge-Response”
- Email Username: your full email address, e.g. my_email@my-domain.com
- Password: the mailbox password you have configured or been given.
How To Setup An Email Account on an Android Device.
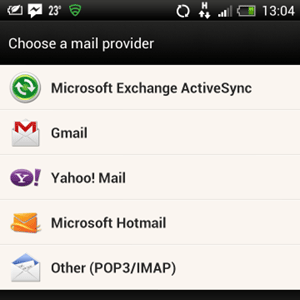
1. Navigate to your email client. You will usually have a default client already installed on your phone, but if you don’t you can download a new app from the play store. Outlook is as good (or bad) as any other, but it’s up to you.
If it is the first email client that you are setting up on your Android device, you will see the screen to your left, or something very similar.
Make sure you select POP3/IMAP from it.
2. On the next screen enter your complete email address and your password and hit Next.
3. Enter the following settings in the next screen: –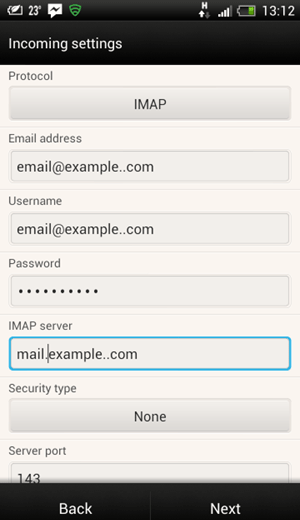
- Protocol: IMAP
- Email address: your whole email address
- Username: your username is the whole email address
- Password: the password for your email account
- IMAP server: mail.netservicehosting.com
- Security type: SSL (or SSL/TLS)
- Server port: 993
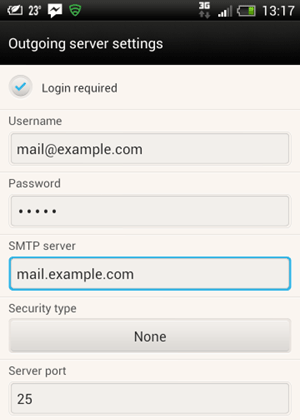
4. On the outgoing server settings screen make sure you select Login Required, and use the following settings: –
- Username: your whole email account
- Password: the password for your email account
- SMTP server: mail.netservicehosting.com
- Security type: SSL (or SSL/TLS)
- Server port: 465
- Requires Authentication: Yes (if you have problems try disabling this otion)
5. On the final screen you will have to enter the account name (it can be anything you like), which will help you remember which mailbox you are using. The other box is so you can enter your own name. Once you are done, hit Finish Setup and you are all done.
How To Setup An Email Account on an IOS Device.
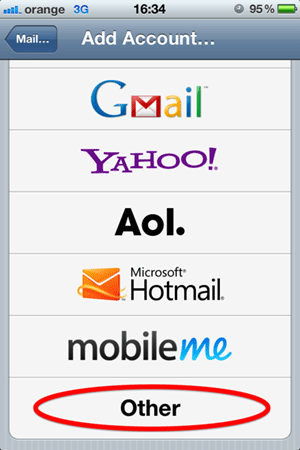 1. To setup your e-mail address on your iPhone or iPad go to your e-mail client and select Add Account and then click on Other.
2. On the next screen you will need to fill in a couple of boxes: –
- Name: That would be your name or the name of the company if a business e-mail
- E-mail: type in the whole e-mail address that you want to setup
- Password: the password for your e-mail account
- Description: here you can place anything that best describes your e-mail account, or you can simply put the e-mail address itself
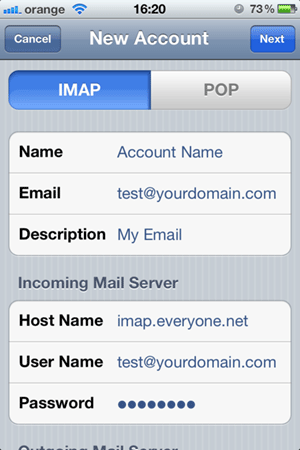 3. Onto the next screen and select IMAP or POP (IMAP will leave a copy of your e-mails on the server and POP will download them on your device, it is advisable that you use IMAP) and use the following settings: –
- Name: That would be your name or the name of the company if a business e-mail
- E-mail: type in the whole e-mail address that you want to setup
- Description: here you can place anything that best describes your e-mail account, or you can simply put the e-mail address itself
- Host name: mail.netservicehosting.com
- Username: the whole e-mail address
- Password: the password for your e-mail account
4. Scroll down to set your Outgoing Mail Server settings as follows: –
- Host name: mail.netservicehosting.com
- Username: the whole e-mail address
- Password: the password for your e-mail account
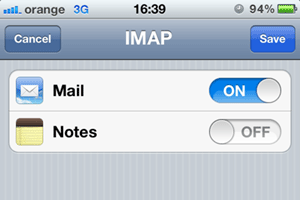 5. On to the next screen you can select if you want the e-mails to be shown or not.
Select Mail to ON.
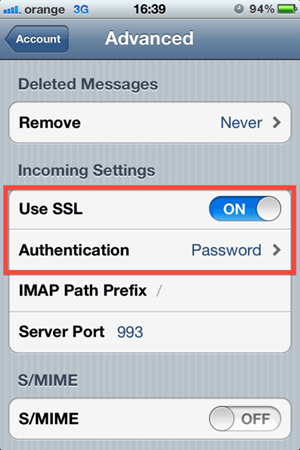 6. On to the next screen and the Advanced settings should be: –
- SSL option must be ON
- Authentication must be set to Password
- Server port must be set to 993
7. Scroll down to your Outgoing mail server settings in the same section and these should be set as: –
- User SSL: ON
- Authentication: Password
- Server port: 465
How To Setup An Email Account on Thunderbird.
 Thunderbird is an email client for the PC, that works perfectly in Windows. This is the program I use and comes highly recommended.
You can download Thunderbird by clicking here (the website will open in a new tab) and selecting the download option.
Once you have installed the software, open Thunderbird and follow the following instructions: –
- Select Account Settings from the Tools menu.
- Click the Add Mail Account button in the bottom-left corner of the window.
- Type in your Name, Email Address and Password.
- Thunderbird will now look up the settings for your email account. Click Stop and then Manual Config to interrupt the automatic setup.
In Manual Config use the following settings: –
- Incoming Hostname – mail.netservicehosting.com
- Port 993 (for IMAP – Recommended) or 995 (for POP3)
- Select SSL/TLS for security connection and Normal Password
- Outgoing Hostname – mail.netservicehosting.com
- Port 465
- Select SSL/TLS and Normal Password
- You may need to select the ‘requires authentication’ option
- For Username enter your email address. Then click Create Account
- Click OK to finish setup

